Table of Contents
IntroductionThis document provides an overview of how to prepare RXTE Standard2 data for analysis. Standard2 data has 16 second temporal resolution and good energy resolution. For spectral analysis on time scales longer than 16 seconds, Standard2 data is the best choice for data analysis. The PCA instrument team has developed a set of tools and practices that will automatically filter the data and provide a high quality output. The preparation process involves running the task 'pcaprepobsid'. pcaprepobsid is a high-level task that prepares a single RXTE observation ID (obsid) for scientific analysis with the PCA instrument (Standard2 data mode). More information about what 'pcaprepobsid' does is given below, but essentially it creates a filter file for the entire observation, and creates an estimated background and calculates dead-time related quantities for each Standard2 file in the observation. Regardless of how you want to slice or combine your data at later stages, you should only need to run 'pcaprepobsid' once on each input observation. Once created the prepared results can be used for filtering or extraction multiple times. As a second optional step, you can merge multiple prepared observations into a single directory. This can be extremely helpful for keeping track of which files you are working on, and making a single global filter file. Preparing a Single ObservationRXTE archive data comes in a very raw form. It is necessary to run a set of standard tools which prepares this data for analysis. The task 'pcaprepobsid' is a standard FTOOL which accomplishes this task. See Figure 1 for an overview of this process. It is only necessary to run pcaprepobsid once per observation. Upon output, a filter file is created, Standard2 backgrounds have been estimated, and dead-time quantities have been computed for both Standard2 and background files. These outputs are suitable for extracting spectra and light curves. The input of 'pcaprepobsid' is a single observation directory, which should have the format delivered by the RXTE archive. For example, a single observation directory will have name 93046-01-02-00, where 93046 is the proposal number, and the later numbers indicate target and visit numbers. The directory contains a single FMI file, as well as pca/, acs/ and hexte/ subdirectories. You cannot use 'pcaprepobsid' on a full proposal-level directory, but must run it once for each observation within a proposal subdirectory. The task 'pcaprepobsid' does not modify the input directory in any way. This can be useful if you have a read-only copy of the archive data. To run 'pcaprepobid', you can run it on the command line, and it will prompt you for inputs: csh> pcaprepobsid > Name of input observation ID directory [93067-01-42-01] 93067-01-42-01 > Name of output results directory [93067-01-42-01-result] 93067-01-42-01-result > Running pcaprepobsid v1.0 > ---------------------------------------- > 93067-01-42-01 2008-04-14T21:50:39 2008-04-14T22:06:17 > FILT: 93067-01-42-01-zzz/FP_1adf146f-1adf1819.xfl > STD2: 93067-01-42-01/pca/FS4a_1adf146f-1adf1819.gz In this case, you were prompted for the observation directory (93067-01-42-01) and the output prepared results directory (93067-01-42-01-result). The remaining text is the output of the task, which shows that it is making a FILTer file and making Standard2 background and deadtime calculations. Like all HEASoft tasks, you can also run 'pcaprepobsid' in non-interactive mode. All of the inputs need to be specified on the command line. For example, the same processing as above can be achieved with, pcaprepobsid indir="93067-01-42-01" outdir="93067-01-42-01-result" Until the new PCA background model is in CALDB, you will need to specify the background model manually on the command line, like this, pcaprepobsid indir="93067-01-42-01" outdir="93067-01-42-01-result" \
modelfile="/path/to/pca_bkgd_cmvle_eMv20111129.mdl.gz"
pcaprepobsid uses default parameters for the above tasks which the PCA team recommends for scientific analysis. It is possible to change any parameter from the default (see below), but not advised. After running 'pcaprepobsid', you should now have an output directory -- 93067-01-42-01-result in this example -- which you will use for further processing. Run this process once for each observation of interest. What Does 'pcaprepobsid' Do?'pcaprepobsid' runs some standard tools that long-time RXTE users will recognize, and some that they may not. Here is a summary of what it does.
The Outputs of 'pcaprepobsid'The output of this task is a new directory, specified by the 'outdir' parameter, which contains several files. These output files can be used as inputs to extractors like pcaextspect2 or saextrct. The outputs are listed below.
pcaprepobsid may create other files but they are not documented, and shouldn't be relied upon. Also, because of the nature of the task, creating multiple and varied outputs, it is essentially required to set clobber=YES. Preparing More Than One ObservationCommonly you will want to process more than one observation at a time. It becomes tedious to type tens or hundreds of commands on the command line to prepare each one in turn. You can use Unix shell capabilities to do simple batch processing and make your effort more efficient! A simple construct to learn is the "foreach" or "for" loop in shell programming. The 'csh' and 'tcsh' shells are commonly used and use the "foreach" construct, while 'bash' is more typically used by programmers and uses the "for" construct. Either way both are similar: they allow you to operate on a list of inputs one at a time. It's better to give a quick example. If you wanted to list the numbers from 1 through 10, one at a time, here is a simple "foreach" loop in csh/tcsh: foreach num (1 2 3 4 5 6 7 8 9 10)
echo $num
end
In this case, the list of inputs is the list of numbers, (1 2 3 4 5 6 7 8 9 10). The "foreach" construct says to run the loop one time for each element in the list, where the variable $num takes each value in succession. In this case, the loop contents are very simple, just to echo (print) the value of $num. This is easy to apply to batch processing of observation data. First, you need to construct a list of your input observations to process. You can do this by using wild-card matching. For example: # csh or tcsh set obslist=93067-??-??-?? or for bash # bash obslist=93067-??-??-?? This uses the shell wild-card pattern 93067-??-??-?? that match any observation directories that have the same form (the ? wild-card matches any single character). You will need to tailor this wild card pattern to match your particular list of observations. You can also simply list each observation. Next, you need to iterate using "foreach" or "for" commands. For csh or tcsh, the command would be, # csh or tcsh
foreach obsid ($obslist)
pcaprepobsid indir=${obsid} outdir=${obsid}-result
end
or for bash users # bash
for obsid in $obslist; do
pcaprepobsid indir=${obsid} outdir=${obsid}-result
done
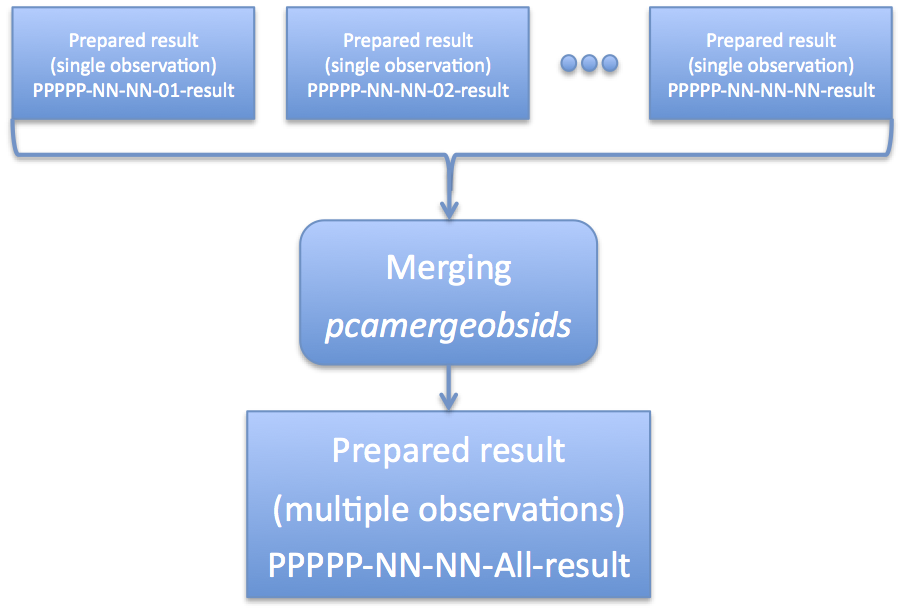
In either case the contents of the loop are the same: run the task 'prepobsid' on each observation directory, sending the output to a directory named ${obsid}-result. You can read further down in this document to find out how to merge multiple prepared observation into a single prepared observation. Absolute or Relative PathsThis task has a parameter 'abspath' which determines whether absolute or relative path names are written to *.lis files. Relative paths are the default. Absolute paths (abspath='YES') are suitable for cases where the user will be combining many different observations, or running tasks from different working directories. However, some tasks have a limit to the size of file names (typically ~100 characters), which may prevent this method from working. Relative paths (abspath='NO') are suitable for cases where the user is running the analysis from the same working directory. As long as follow-up tasks are run from the same working directory, relative paths should work. Supplying a Different Target PositionBy default, xtefilt uses the RA_OBJ and DEC_OBJ keywords stored in the FITS index files of the observation. These keywords are based on RXTE SOF planning inputs. However, sometimes these inputs are incorrect, or may not represent the best scientific target location, and the user will wish to enter a different position. Users can specify a new position with the 'ra' and 'dec' keyword parameters (which are the J2000 target position in degrees). For example, if your target is at an R.A. of 123.45 deg and Decl. of -67.89 deg, then call 'pcaprepobsid' with the following keywords: pcaprepobsid ... ra=123.45 dec=-67.89 There are several reasons one might want to do this. If there is an offset pointing, the RA_OBJ and DEC_OBJ may represent the offset pointing direction instead of the true target position. Or, a better target position may be discovered only after the RXTE data were processed. Or, different data sets may have been processed by RXTE with different positions, and the user desires to reprocess all of the data sets with a single, consistent position. Advanced UsersAdvanced users that wish to tweak their settings are still in luck. The archane settings to 'xtefilt' and 'pcabackest' are still available as hidden parameters. By typing 'fhelp pcaprepobsid' one can find all of these hidden settings. However, for 99% of use cases, this should not be necessary. Merging Multiple ObservationsAs mentioned above, it is quite often that a single scientifically interesting observation is broken into multiple RXTE observational data sets. In some cases, this may be at the request of the observer (for example, multiple monitoring observations), but in other cases a long RXTE observation must be broken into several parts for practical reasons. However, at the scientific analysis stage, one will often desire to combine multiple observation data sets into a single logical data set. This is not difficult, and the RXTE software handles multiple files straightforwardly. Because there are several sets of files to keep track of -- source files, background files, filter files, etc -- it would be nice to have way to automate this process. Enter the task 'pcamergeobsids'. Figure 2 gives an overview of what this task does. The task 'pcamergeobsids' is a high-level convenience task that combines multiple Standard2 directories into a single directory. This task eases the job of merging multiple observations into a single observation, and thus extracting spectra or light curves. The task essentially concatenates list files, which list filter files and Standard2 files, into a single list file for the combined set. It also creates a single RXTE filter file covering all observations, which has been merged and time-sorted. As an alternative to using pcamergeobsids, the user can collect the desired files by their own methods. ExampleTo merge a list of observations, you first need to make a list of those observations on your computer. The easiest way to do this is to use the wild-card capability of most Unix-like computers. The command: ls -d 93067*-result > 93067-all.lis make a file 93067-all.lis which lists all prepared result directories. Note you will want to tailor this to your own observation IDs! In the example above, the pattern "93067*-result" would match all directories that have been produced by the task 'pcaprepobsid' beginning with that obsid name. Note that you want to list the names of the directories and not the contents. This is why the '-d' option to 'ls' is so very important. You run the task 'pcamergeobsids' interactively in the following way: csh> pcamergeobsids > List of input directories (or @filename.lis) [] @93067-all.lis > Name of output results directory [] 93067-all-result You can also run the task 'pcamergeobsids' with explicit parameters on the command line: pcamergeobsids indir=@93067-all.lis outdir=93067-all-result The 'indir' parameter accepts a list of input directories, which should be results prepared by 'pcaprepobsid'. It is also possible to merge the output of 'pcamergeobsids' with other data sets! The 'outdir' parameter gives the name of the new prepared results. The "@filename.lis" pattern is a common one within HEASoft. It indicates that filename.lis is a file that a list of multiple files. Using the standard Unix wildcard matching, it's possible to create such a file. By default the task 'pcamergeobsids' does not copy the large data files, but links to them instead. Read on below if you want to explicitly copy all of the input files instead of linking them. InputsThe input to the task is a list of input directories, either comma-separated or as a .lis list file. These directories must have the directory and file structure produced by pcaprepobsid. Thus, you should run pcaprepobsid at least once for each observation of interest, and then merge those outputs with pcamergeobids. Your input list may optionally point to each subdirectory's "pcaprepobsid_done.txt" file instead of the parent subdirectory. This is a convenient way to search for only those observation directories that have successfully been processed by pcaprepobsid. For example the shell command: ls 96443-*/pcaprepobsid_done.txt > indirs.lis will automatically find any 96443-* subdirectory that has been successfully processed by pcaprepobsid. pcamergeobsids will automatically uses the parent subdirectory for further processing. OutputsThe output of pcamergeobsids is a new results directory, also of the same format as produced by pcaprepobsid, which can be used for further scientific processing. The output of pcamergeobsids is suitable to be used as input to itself. Thus, it is possible to merge sub-groups of data with pcamergeobsids, and then use the same task to merge those sub-grouped results into a single master data set, ad infinitum. To 'COPY' or To 'LINK'pcamergeobsids gives you a choice to LINK or COPY the raw data. The setting copymeth=COPY will copy all relevant inputs to the output directory, including Standard2 files, backgrounds, and files with dead-time quantities. Use this setting if you plan on deleting the individual observation data, or plan on moving observation data around. This option has the down side of using twice the disk space as the original data. The setting copymeth=LINK will create new list files, and a merged filter file, but none of the Standard2 files, backgrounds or files with dead-time quantities are copied into the output directory. Use this setting if you wish to save disk space, or are experimenting with merging different data sets. This option has the down side of forcing you to preserve the input directories where the original data lives. The Next StepsAt this point, you should have prepared your RXTE PCA data for scientific analysis. The next step is to filter your data for your particular analysis strategy. You can read more about this on the screening detail page. |