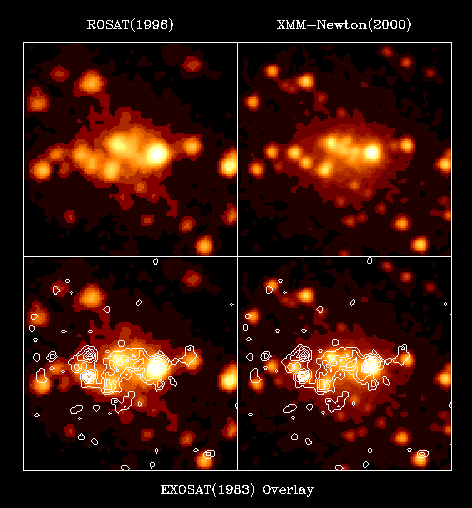
Contour OverlaysContours may be overlayed onto an image already plotted to the display with the CONTOUR/OVERLAY command. If the contour map's coordinates differ from the underlying image, a transformation will be automatically calculated to align the contours with the image even if the two have different rotation, size, and centering. The only caveat is that both of the maps used to plot the contour and the image must be in memory at the time of the overlay.For example:
Let's walk through what happens step-by-step: [XIMAGE> read dispimage.fits First, let's assume that ximage has just been started and all the default settings are in effect. The current map will be MAP1 in this case. Note: ximage always saves the first map read in, but we'll ignore that fact for simplicity in this example. The map command shows the following:
        MAP             Size      Rb Center        Codes
        --------------- --------- -- ------------- -----
  C-> 1 dispimage.fits  256x256    1 256.5,256.5
      2
      3
      4
      5
      6
      7
      8
      9
The C with the arrow indicates that the current map is MAP1. [XIMAGE> disp The map command shows the following:
        MAP             Size      Rb Center        Codes
        --------------- --------- -- ------------- -----
 DC-> 1 dispimage.fits  256x256    1 256.5,256.5
      2
      3
      4
      5
      6
      7
      8
      9
The D with the arrow indicates that the displayed map is MAP1. [XIMAGE> save The saved map is defined as MAP9. Regardless of the current map, the effect of the save command will be to copy the current map to the saved map (MAP9). The map command shows the following:
        MAP             Size      Rb Center        Codes
        --------------- --------- -- ------------- -----
 DC-> 1 dispimage.fits  256x256    1 256.5,256.5
      2
      3
      4
      5
      6
      7
      8
      9 dispimage.fits  256x256    1 256.5,256.5
[XIMAGE> read contimage.fits The map command shows the following:
        MAP             Size      Rb Center        Codes
        --------------- --------- -- ------------- -----
  C-> 1 contimage.fits  512x512    1 512.5,512.5
      2
      3
      4
      5
      6
      7
      8
 D -> 9 dispimage.fits  256x256    1 256.5,256.5
The map read from contimage.fits has overwritten what was in the MAP1 position (i.e. the map that we displayed). Notice, however, that the displayed map indicator is now pointing to MAP9, the saved map. When a copy of a map is made, for example using the save command, the original and copied map are linked together such that ximage is aware of all maps which are exact copies of each other. When the original displayed map, MAP1, was overwritten, ximage found that MAP9 contained an exact copy of the original map and now refers to that map for any interactions with the display. [XIMAGE> cont/over In order for a contour overlay to match the coordinates of the underlying image, the original display must be available in memory so that a transformation between the contour map and the displayed map can be calculated. If the displayed map has been modified with a command such as smooth or rebin, overwritten in memory, moved or freed, and no copy of it exists in any map slot, the contour will be plotted "as is" with no transformation applied. Consequently, it is recommended that the user make a copy of a map after it is displayed if a contour overlay is planned, as in this example where we executed the save command immediately after the disp command. The map command shows the following:
        MAP             Size      Rb Center        Codes
        --------------- --------- -- ------------- -----
  C-> 1 contimage.fits  512x512    1 512.5,512.5
      2
      3
      4
      5
      6
      7
      8
 D -> 9 dispimage.fits  256x256    1 256.5,256.5
Note that the displayed map has not been affected by the contour overlay. Since a contour overlay may be rotated and resized from its original orientation, commands such as pix/cur and the coordinate readout of the /xtk device do not refer to the contour map directly, but rather the underlying image. Multiple Maps with OverlaysIn cases where more than two maps are involved in a particular plot, it is better to use the map command exclusively instead of save and restore. Let's start another example to illustrate this usage of the map command:
[XIMAGE> map 2
[XIMAGE> read example.fits
The command map 2 sets the second map slot, MAP2, as the current map. When the read command is executed, the image is read into MAP2, the current map. [XIMAGE> map copy 2 3 This command copies the second map, MAP2, into the third map slot, MAP3. If a map-altering command such as smooth is executed the current map will be affected, but the copy will remain unchanged. Also, the display and contour can take a map as an argument, allowing a specified map to be plotted without first changing the current map. [XIMAGE> disp 3 This command plots an image of MAP3, while the current map remains MAP2. After this sequence of commands, the map command shows the following:
        MAP             Size      Rb Center        Codes
        --------------- --------- -- ------------- -----
      1
  C-> 2 example.fits    512x512    1 512.5,512.5
 D -> 3 example.fits    512x512    1 512.5,512.5
      4
      5
      6
      7
      8
      9
Now we can combine the usage of multiple maps with contour overlaying. The following script reads a ROSAT image of M31 into MAP1, an XMM-Newton image into MAP2, and an EXOSAT image into MAP3, displays the ROSAT and XMM images side by side, overlaying each with contours from the EXOSAT image:

cct/set bb
lev/num=64
map 1
read/ra="00 42 44.31"/dec="41 16 13.3"/size=128/rebin=8 \
   rp600068n00_bas.fits
smooth/scal=1
map 2
read/ra="00 42 44.31"/dec="41 16 13.3"/size=-8.5333 \
   P0112570601M2S002IMAGE_8000.FTZ
smooth
map 3
read size=300 cma_a04397.img
smooth
vie 2x2
disp/log 1
vplabel/cur/top/font=roman "ROSAT(1996)"
disp/log 2
vplabel/cur/top/font=roman "XMM-Newton(2000)"
disp/log 1
cont/over/lin/first=4 3
disp/log 2
cont/over/lin/first=4 3
vplabel/bot/font=roman "EXOSAT(1983) Overlay"
Please send reports of errors to : xanprob@athena.gsfc.nasa.gov HEASARC Home | Observatories | Archive | Calibration | Software | Tools | Students/Teachers/Public Last modified: Wednesday, 29-Mar-2006 14:33:38 EST |

