Creating NICER Light CurvesReturn to: Analysis Threads | Analysis Main Page
OverviewProducing light curves is the first step of temporal X-ray data analysis. This thread introduces how to make NICER light curves using the standard HEASoft astronomical tools. Read this thread if you want to: Produce light curves from NICER data using Xselect Last update: 2022-06-08 IntroductionNICER scientific analysis ultimately leads to spectral analysis and light curve (timing). This thread provides an introduction to generation of light curves from NICER data. After running the standard processing pipeline nicerl2, a cleaned, MPU-merged event file is produced. This output product is the "cl" file, and this is the event file which you will use for light curve analysis. We will use the tool "xselect" for light curve extraction. The tool we use to bin the data is the HEASoft XSELECT package and the output data type is a light curve file. This thread describes a hands-on example of producing light curves in various time bins or energy bands using the Xselect HEASoft tool. For the purposes of this tutorial we will assume that you wish to make a light curve from a single, MPU-merged, cleaned event data file from a single OBSID. This example takes the NICER data of the nearby sun-like star kappa1 Cet on December 10, 2019 (ObsID 2300020114) and produces a day-long light curve. It does not provide a pulsation search or other advanced timing analysis. PrerequisitesHere is what is needed:
Initial StepsWe recommend that you reprocess and rescreen NICER data with the latest NICER calibration using nicerl2 before starting the analysis (please see the analysis thread "nicerl2" for more information). This example uses an additional conservative screening criterion excluding high cut-off rigidity intervals with COR_SAX > 1.5, as the target has a moderate X-ray flux. First, change the working directory to the location of your observation data files.cd /NICER/data/top/directory
In this example, we will be working with Observation ID 2300020114, so you
can verify that this directory exists.
ls
 2300020114/
The output of the "ls" command produces one directory which is our
observation's data directory.
In this example we will reprocess to only include data in the COR range
of >1.5 GeV/c, so we will use the nicerl2 command,
After running nicerl2, you find reprocessed event files under
obsid/xti/event_cl/. In this example, we can run the "ls" command
to reveal the contents of that directory.
Producing Light CurvesNow we will use the xselect environment to extract a light curve. We move to a working directory and launch Xselect.
term> xselect

                         **  XSELECT V2.5a  **

> Enter session name >[xsel5471] lc
Type any session name you like. This name will be the header of the Xselect's temporary files. You can relaunch the session with this name if you save it at the exit.
You can read a cleaned event file (*_cl.evt) by typing "read events".
Xselect asks you to enter a relative or absolute path to the event_cl directory and event file name.
Xselect will prompt you for the event file's working directory and the
name of the file. You can also specify the event file name directly in
the command
Xselect will print some diagnostic information about the event file
to the console.
Once we have loaded event data into Xselect we can produce a light curve. Type the "extract curve" command to generate a light curve with the default 16 sec time bins. lc:NICER-XTI-PHOTON > extract curve
Xselect will do some work and produce a light curve. The console
output indicates some statistics about the events that xselect
processed.
You can see the light curve on a PLT/QDP window.
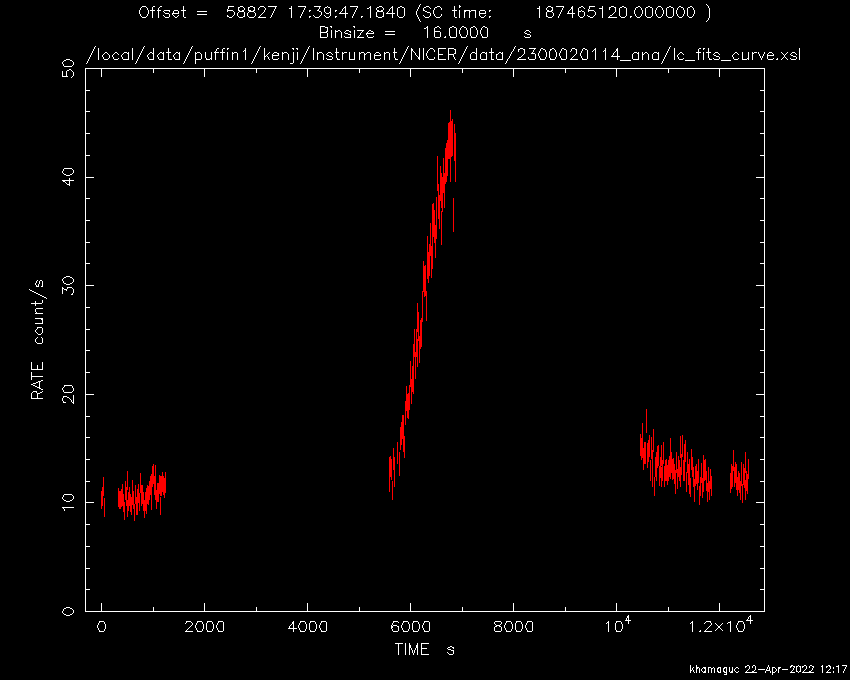
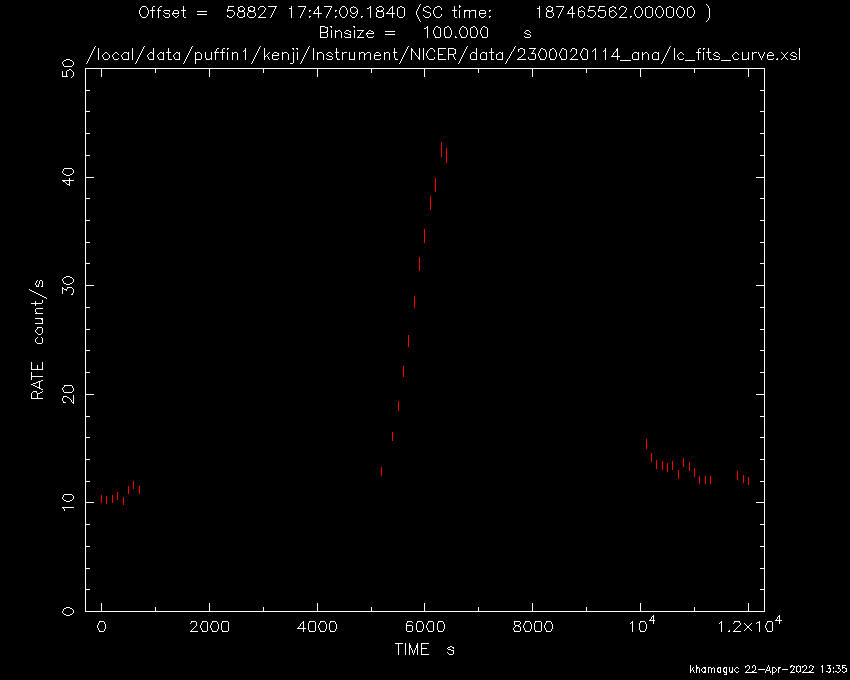
Choosing A Different Time Bin SizeYou can change the time bins by the "set binsize" command. By default the bin size is 16 seconds. We can make the time bin smaller, which allows one to see more fine details (but with larger statistical errors), or make the time bin larger which allows one to see coarser details with more statistical accuracy. In this example, we will choose 100 sec bins. lc:NICER-XTI-PHOTON > set binsize 100
and then run "extract curve" again.
lc:NICER-XTI-PHOTON > extract curve
We can again plot the light curve with the "plot curve" command.
lc:NICER-XTI-PHOTON > plot curve
PLT> r y 0 50
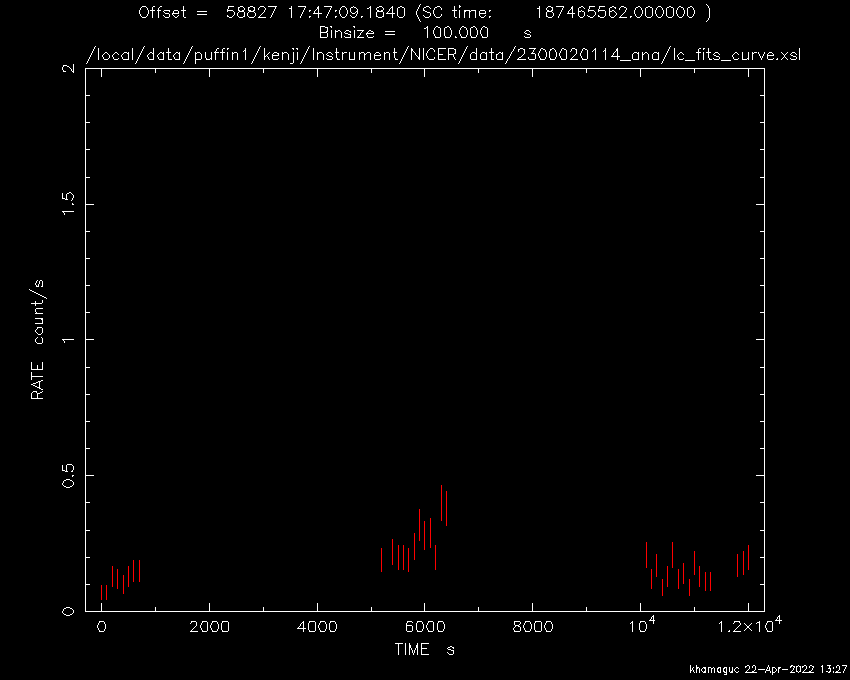
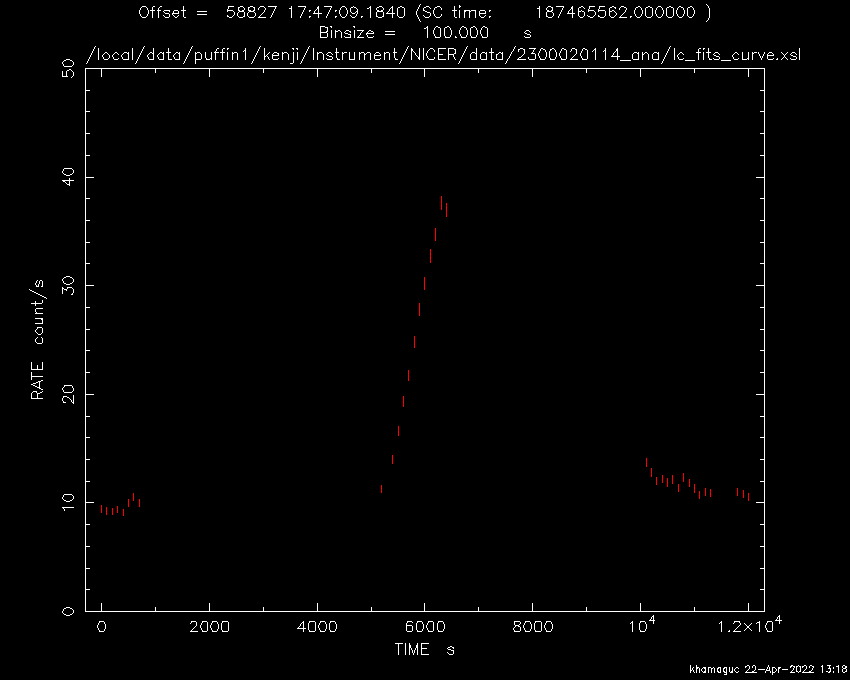
Choosing A Different Energy RangeThe above light curves include all cleaned event data between 20-1501 PI channels, equivalent to 0.2-15 keV. Since in this example the target is a soft source, we limit the energy range between 0.3-2 keV (30-200 PI channels) with the "filter pha_cutoff" command. For this filter, we give the lower and upper pulse height range.
In our example, we are looking for the energy range 0.3-2 keV, so we
want to use pulse height bins 30 - 200.
(see Gain Calibration for more information
about NICER energy channel binning).
The light curve does not change remarkably though the total counts reduce slightly from 71630 counts to 63372 counts. By contrast, we can examine the 5-10 keV range and see that the light curve is quite different. The 5-10 keV range corresponds to PI channels 500-1000. In this higher energy range, most events originate from particle background instead of from the target. To make this second lighr curve, first we reset the PHA filter and then set the filter between 500 and 1000 and then extract a new light curve. lc:NICER-XTI-PHOTON > clear pha_cutoff
lc:NICER-XTI-PHOTON > filter pha_cutoff 500 1000
lc:NICER-XTI-PHOTON > extract curve
lc:NICER-XTI-PHOTON > plot curve
PLT> r y 0 50
Saving Light CurveIf you quit xselect, your results will not be saved by default. You can save the light curve in a FITS file for further analysis. Use the "save curve" command in xselect, which will prompt you for a file name. lc:NICER-XTI-PHOTON > save curve
> Give output file name >[lckese] lc03020.fits
Wrote FITS light curve to file lc03020.fits
Or, you can specify the light curve file name on the command line,
like this,
save curve lc03020.fits
Producing a Light Curve from Multiple DatasetsYou can make light curves from multiple NICER datasets in the same way by simply listing up event files when loading event files with "read events." Next Steps: Related TopicsYou can feed the saved FITS light curve into downstream tools for further analysis. For example, HEASARC provides the Xronos package for plotting multiple light curves, making a hardness ratio time-series, and so on. Modifications
|


- HEASARC Director: Vacant
- NASA Official: Ryan Smallcomb
- Web Curator: J.D. Myers
- Last Modified: 8-Jun-2022