Complete Spectral Product PipelineReturn to: Analysis Threads | Analysis Main Page
OverviewOne of the most crucial tasks for any X-ray observation is the analysis of spectra. This thread describes a complete end-to-end spectral product pipeline called nicerl3-spect. This task generates a spectrum, background and associated responses in the NICER-recommended way. Read this thread if you want to: Extract spectral products in a straightforward way Last update: 2023-02-06 IntroductionSpectroscopy is a fundamental pillar of most X-ray data analysis projects An X-ray spectrum provides information about the X-ray target that usually cannot be found by any other means. Thus, extracting a spectrum is a fundamental task that almost all NICER users will need to do. This thread describes how to extract all NICER spectral products using a single pipeline task called nicerl3-spect. This task generates all products needed for spectral analysis: spectrum, background estimate, responses (ARF and RMF), and some other script files to get you started with analysis. The nicerl3-spect task became available with HEASoft 6.31, which was released in November, 2022. The task provides a straightforward and streamlined way to extract spectral products with NICER-recommended methods. While nicerl3-spect is targeted at the "new user" of NICER data, it is equally usable by advanced users. Many of the complicated and/or poorly documented steps are now done automatically. 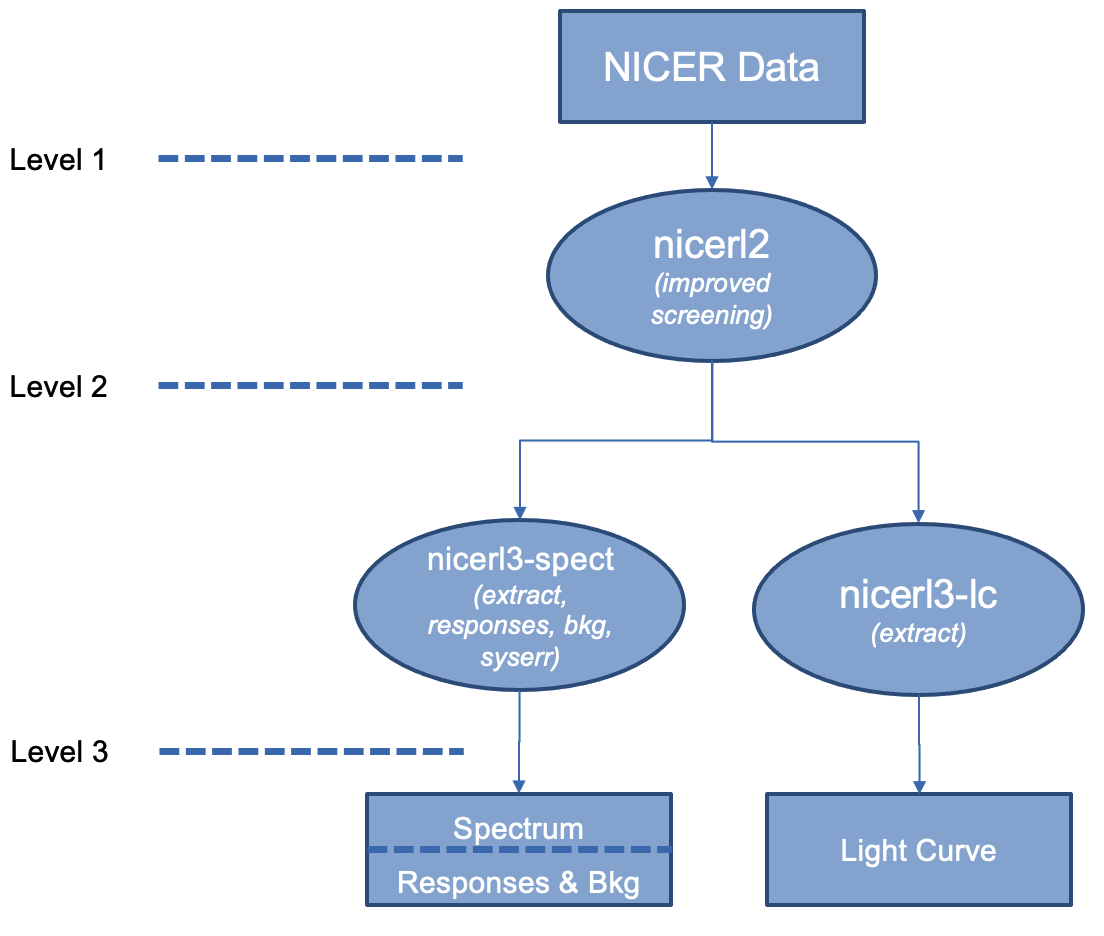 Figure 1. Workflow showing nicerl3-spect and nicerl3-lc to make standard spectral and light curve products. Figure 1 shows the basic workflow for any NICER analysis using the new nicerl3 high level pipeline tasks. The user first runs nicerl2 to apply standard calibration and screening to the data, and then runs the nicerl3-spect task to create spectral products. For more information about the "levels" of NICER analysis, please see the NICER Processing Levels thread. The input of nicerl3-spect is the output of nicerl2. Namely, the clean event file ("cl" file), plus other auxiliary files like the filter file (MKF file). Some background models, such as 3C50, also use the unfiltered event files ("ufa" files). Without special prompting, the nicerl3-spect task automatically recognizes the directory layout of a NICER standard observation as well the situation where the user directed nicerl2's outputs to a different directory. The nicerl3-spect task will make many automatic decisions for you, such as choice of background model, but the advanced user is free to make alternate choices. As output, nicerl3-spect makes the following products:
nicerl3-spect also creates a graphical plot of the spectrum. This is suitable for quicklook pipelines that want a standard view of the spectrum. If you encounter an error or warning when trying to plot the spectrum, please see Choosing Different Graphical Ouptut Options section below. nicerl3-spect chains together multiple standard NICER tasks in the team-recommended fashion. Although not recommended, users can also run the tasks manually themselves as well. The tasks are,
Although individual manual tasks are provided, the NICER team recommends to use nicerl3-spect to generate all spectral products in a consistent manner. The following discussion shows the basic operation of nicerl3-spect. For more detailed information on task operation, please see the nicerl3-spect help file PrerequisitesThe nicerl3-spect task requires the output of the nicerl2 task. This means EITHER, the data processed "in-place" in an existing observation directory, or an output directory as described in the "WORKING WITH READ-ONLY INPUT DATA" section of the nicerl2 help file. Basically, the task will look in the supplied input directory name for the subdirectory xti/event_cl, or in the subdirectory itself, for the required files. The required files are described above. Extract Spectral ProductsRun the nicerl3-spect spectral product pipeline task with the following command.
nicerl3-spect 1234567890 clobber=YES
where
Upon completion, nicerl3-spect will product the products as described
above. They will be placed in the output directory. As an example, let's list the
directory and see what products were produced by this run.
As you can see, a spectrum, responses, background files are produced. The PNG file is a graphical quicklook file. The "load" file is an XSPEC script that helps us load these products quickly into XSPEC. Load Spectrum into XSPECWe can use the "load" file to load these files into XSPEC and get started quickly.
First, we start XSPEC.
Now, we can plot the resulting spectrum in XSPEC.
The result is shown in Figure 2. 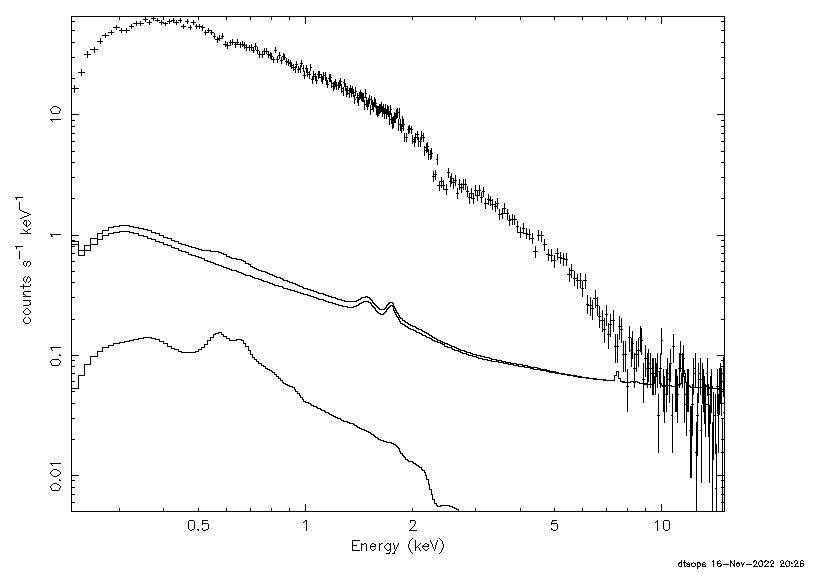 Figure 2. Sample XSPEC output. In this example, we have used the default SCORPEON background model which is an XSPEC model. This model is shown with the data (i.e. no background subtraction). A note on how XSPEC deals with subdirectory names. XSPEC
does not handle subdirectory names well. It will not understand if
you run nicerl3-spect from one directory and then change to another
directory. Consider the following example,
There is no way around this, other than to avoid changing directories between running nicerl3-spect and running XSPEC, or rewriting the *.xcm files to change the path names after running nicerl3-spect. Next Steps: Spectral AnalysisWhat happens next is really about the science. At this point, the scientist needs to understand and apply the correct spectral model to their data. That is beyond the scope of this analysis thread.
As an example, if your target can be modeled as an absorbed power law
spectrum model, define it as,
Variation: Applying Additional Screening to DataA common situation will be that the user desires to apply additional temporal screening to their data. The cause of this is typically scientifically-motivated. For example, a user might want to look at the spectrum of a burst, or during eclipse, or during a high or low state. Generally speaking the user will have to construct a GTI (Good Time Interval) file which contains the desired time range. You may be able to use maketime or nimaketime to get a new GTI file, or you may have to construct a GTI file manually yourself. For an example of how to do this (for Swift) please see the Swift BAT thread Making BAT Light Curves (but please beware that for NICER MJDREFI=56658 and MJDREFF=7.775925925925930E-04). Once you have a GTI file, you can apply it simply from the nicerl3-spect
command line,
If you want to apply different quality screening levels, such as overshoots or undershoots, it is recommended that users run nicerl2 again. To reduce execution time, you can set the nicerl2 parameter tasks=SCREEN and it will only perform the screening step again, without performing the other more time consuming steps. Variation: Choosing Different Background ModelsTHe NICERDAS suite contains multiple NICER background models, starting with NICERDAS version 10 (HEASoft 6.31, released November 2022). You can choose any of these models when you run nicerl3-spect. By default, nicerl3-spect chooses the SCORPEON background model, with script output. The "script" indicates that the result is a background estimate that is an actual model within XSPEC, that can be adjusted and fitted along with your target's spectral model ana parameters. However, you can select other background models and formats. These are described briefly below. SCORPEON Model. (default) By default, the SCORPEON model creates an XSPEC model and writes it to the file designaed by bkgscript. Settings "bkgmodeltype=scorpeon bkgformat=script" (for more details see niscorpeon). SCORPEON File. A "file" output will product a static background file that most XSPEC users are accustomed to, but it will not be adjustable. This is most suitable for users that can't adapt to the complexity of the fully fittable SCORPEON model, or need to exchange data with other non-XSPEC users. Settings "bkgmodeltype=scorpeon bkgformat=file" (for more details see niscorpeon). 3C50. The 3C50 model due to Remillard et al. is distributed with NICERDAS. All software and calibration files are included within the NICER environment, with no separate downloads required. The 3C50 model creates a background file (not a fittable model). Settings "bkgmodeltype=3c50 bkgformat=file" (for more details see nibackgen3C50). Space Weather The Space Weather model due to Gendreau and Corcoran is distributed with NICERDAS. All software and calibration files are included within the NICER environment, with no separate downloads required. The Space Weather model creates a background file (not a fittable model). Settings "bkgmodeltype=sw bkgformat=file" (for more details see nispaceweather).
For example, to run with the 3C50 model, use the following command,
Each of the background models has additional parameters or settings that allow more in-depth control of the model generation. nicerl3-spect does support these. For the SCORPEON model, the bkgcomponents, bkgvariant, bkgsoftlanding and bkgver parameters are passed to the SCORPEON modeling tasks, which are documented on the SCORPEON help file pages. For the 3C50 model, the hbgcut and s0cut parameters that control screening of extreme conditions are passed to the nibackgen3C50 model, which are documented on the nibackgen3C50 page. For the Space Weather model, there are no additional parameters. Variation: Choosing Different Input File Namesnicerl3-spect is designed by default to work with NICER observation data within its standard observation directory. However, in some cases the user will have done their "own" analysis and thus generated their own cleaned event files. It is still possible to use nicerl3-spect to generate spectral products. You can use nicerl3-spect on any NICER event files. They are not required to be in observation directories, as long as you explicitly enter all of the required file names. You still must generate by yourself a merged "cl" event file, a merged "mkf" (filter) file, and a merged "ufa" file if you use the 3C50 background model. To generate merged event files, you can use the task "niextract-events". This task will preserve FPM selection information of individual event files and carry it over to the merged file. To generate a merged MKF (filter) file, you can use the nimkfmerge task. This task will merge individual filter files into a single file. You can also generate these products in your own way (i.e. by also running nicerclean or niautoscreen), but you must be sure to maintain FPM selection information by using NICER tasks. The "extractor" task and/or "xselect" will not do this properly.
Once you have merged products, you can generate products using the
following recipe. Let's assume the merged event and MKF files are
called merged_ufa.evt, merged_cl.evt and merged.mkf, respectively.
This call wil generate products using the 3C50 model.
Note that in this case the "indir" is still required but not used. You can set it to be any dummy readable directory. In the examples above, we used indir="." which is the current working directory. Any readable directory can be used. There are many more options to nicerl3-spect. If you want to take complete control of the process, you can set the output file name options explicitly to what you desire. Please see the nicerl3-spect help file for more information. Variation: Using pyXSPECThe NICER tools support both classic XSPEC as well as pyXSPEC. To change to python output, set outlang=PYTHON.
For example,
To use within Python, you must have a supported version of Python
(Python 3.5 or greater) with pyXSPEC installed. Then start python
Finally, load the spectral products into pyXSPEC:
Variation: Choosing Different Graphical Output OptionsBy default, the nicerl3-spect task produces a PNG output file. The user can make other plotting choices. To completely disable an output plot, use the doplot=NO option.
To choose different graphical output formats, use the
plotfiles parameter. For example, to output both postscript
and PNG files, use the following command line.
Please note that the default graphical output format is PNG. If your computer does not have a PNG graphical library installed (typically "libpng"), you may experience an error. If you can, you may wish to install a PNG output library or driver for your computer, or you may wish to try an olternative graphical output as described above. To always show the background, instead of subtracting it, set plotbgsub=NO. When bkgformat=script, background is never subtracted, regardless of plotbgsub. Variation: Choosing Different Output File Namesnicerl3-spect will choose sensible file names for its output files, but you can modify this.
By default, nicerl3-spect will notice the name of the cleaned event
file and use that file name and subdirectory as a basis for all output
file names. For example, if the cleaned event file name is
If you are trying different variations with the same basic inputs,
consider setting the suffix parameter to avoid overwriting existing
files. For example, if you are comparing the SCORPEON and 3C50
background models with the same inputs, you could run nicerl3-spect
twice with two different suffix values. In this case the following
commands would achieve this,
If you want to take complete control of the process, you can set the output file name options explicitly to what you desire. Please see the nicerl3-spect help file for more information. What Can Go Wrong: No Good TimeGenerally speaking, nicerl3-spect can terminate due to an error condition. Please read the error message for more information about how to remedy the situation. However, there one special condition that is not strictly an error, but still results in no products. This occurs when the user's cleaned event file has no good time. This may happen because various screening parmaeters are extreme and exceed the recommended good ranges. A cleaned event file with no events and no good time is technically a perfectly valid event file, but it is not possible to produce any pipeline output products. If this condition does occur, the task will print a warning message, and exit with error status 218. An automated script calling nicerl3-spect can use the exit status to determine a course of action. If the caller detects status code 218, this indicates that the caller should not expect any products and should move on. Modifications
|


- HEASARC Director: Vacant
- NASA Official: Ryan Smallcomb
- Web Curator: J.D. Myers
- Last Modified: 6-Feb-2023